

Working on Teams gave me a pretty good idea about how video-calling platforms work. For the project, I used Twilio Programmable Video to add the video calling feature. In this tutorial series, I am going to explain how I integrated Twilio Video into a React App, so that you can do it too!
Set up the React App
Before we begin, make sure you have node and npm installed on your system. Let's start by creating and running a React App locally. Run the following commands on your terminal:
$ npx create-react-app --use-npm twilio-video-cra
$ cd twilio-video-cra
$ npm start
Your app should now be running on http://localhost:3000.
You can go ahead and delete test-related files (App.test.js and setupTests.js) and logo.svg inside the src folder, since we won't be working with those. Delete all the code inside App.css and replace the code in App.js with the following:
import React from 'react';
import './App.css';

function App() {
  return <div className='App'></div>;
}

export default App;
The code inside the src directory constitutes the code of the client-side of the app.
Get Twilio Video API Credentials
To be able to use Twilio Programmable Video in your app, you would need to create an account on Twilio and generate an API key for Twilio Video. You can login or create a free account on Twilio here. You'll need to verify your account through email if you've created a new account. Once you've done that, you'll see your account console.
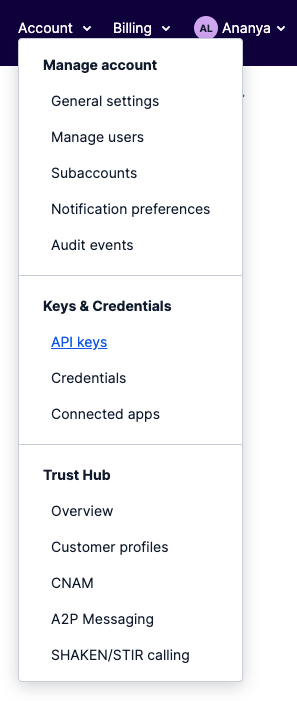
Hover over "Account" on the top right corner of the navigation bar and go to the "API keys" section under Keys & Credentials.
Click on the "Create new API key" button and give a name to your API key. I named mine twilio-video-cra. Set the key type as "Standard" and create the key. A set of fields and values like SID and SECRET will appear. You'll need these values so keep this tab open for now.
Create a file named .env in the root of your directory. Add the following code inside it:
TWILIO_ACCOUNT_SID=
TWILIO_API_KEY=
TWILIO_API_SECRET=
Assign the variable TWILIO_API_KEY the value of SID and TWILIO_API_SECRET the value of SECRET. Don't enclose the key and secret in quotes.
Go to General Settings of your Account and copy the ACCOUNT SID field. Assign this to be the value of TWILIO_ACCOUNT_SID.
Set up an Express server
The next step is to get an Access Token to use the Twilio Video Library, which will be used to authenticate the client-side of our application. We can generate Access Tokens using the Twilio Helper Library. Twilio recommends generating an Access Token for each user on the server-side of our application. Create React App is limited in that it sets up an application that only renders on the client-side. Thus we would need to create a server on our own.
I picked Express.js for this because it's fast, easy to set up, and I've worked with it before. In a separate terminal tab than the one running your React App, create a folder named server in the root directory. Move the .env file we created earlier inside this folder.
$ mkdir server
$ mv .env server/.env
$ cd server
Initialise this directory using npm and install Express.js.
$ npm init
$ npm install express --save
We'll install a few more libraries that will be useful to us (I will elaborate on why later):
$ npm install dotenv
$ npm install -g nodemon
Create a file index.js inside the server directory and add the following code inside it:
const express = require('express');
const app = express();
const PORT = 5000;

app.listen(PORT, (err) => {
  if (err) throw err;
  console.log(`Server ready on http://localhost:${PORT}`);
});
nodemon is a tool that helps automatically monitor changes to your node.js application in real-time, without having to restart the application every time you make a change. On your terminal, run the following command and you should see this output:
$ nodemon
[nodemon] 2.0.12
[nodemon] to restart at any time, enter `rs`
[nodemon] watching path(s): *.*
[nodemon] watching extensions: js,mjs,json
[nodemon] starting `node index.js`
Server ready on http://localhost:5000
And voila! Your server is running locally :D
Generate and Send Access Tokens to the client
We need to install the Twilio Helper Library to generate Access Tokens for the users:
$ npm i twilio
Add the following method at the end of index.js file:
function generateAccessToken(identity, room, config) {
  // use the twilio helper library to get Access Tokens
  const twilio = require('twilio');
  const AccessToken = twilio.jwt.AccessToken;
  const VideoGrant = AccessToken.VideoGrant;

  // generate a video grant for the room
  let videoGrant;
  if (room) videoGrant = new VideoGrant({ room });
  else videoGrant = new VideoGrant();

  const token = new AccessToken(
    config.accountSid,
    config.keySid,
    config.secret
  );
  token.addGrant(videoGrant);
  token.identity = identity;
  return token;
}
To get the value of the token generated above, the client will make GET requests to the server with the value of room (name of the room) and identity (username of the user) sent in the params of the request. To handle the GET request on the server, add the following method in index.js:
// read the required environment variables from .env file
require('dotenv').config();
const config = {
  accountSid: process.env.TWILIO_ACCOUNT_SID,
  keySid: process.env.TWILIO_API_KEY,
  secret: process.env.TWILIO_API_SECRET,
};

// handle GET requests from the client to send the generated Access Token
app.get('/api/video-token/:identity/:room', (req, res) => {
  const token = generateAccessToken(
    req.params.identity,
    req.params.room,
    config
  );

  res.json({ token: token.toJwt() });
});
Notice the use of dotenv here. dotenv is a library that loads the environment variables from the .env file.
Try it out!
Now that we have the API route set up, let's actually try to fetch the value of the token on the client. Since the client and server run on separate ports (3000 and 5000 respectively), we need to set the server's port as a proxy to the client, so that the React App server knows to send any unknown requests to your API server. This avoids any CORS issues as well. Refer to this page for more information.
To do this, add a proxy field in package.json of the client (not the server!).
"proxy": "http://localhost:5000"
Finally, let's test the server API by making a GET request to it in a useEffect hook inside App.js. Replace the code inside App.js with the following:
import React, { useEffect } from 'react';
import './App.css';

function App() {
  useEffect(async () => {
    const identity = 'ananya';
    const room = 'room-1';
    const res = await fetch(`/api/video-token/${identity}/${room}`);
    const data = await res.json();

    console.log(data);
  }, []);

  return <div className='App'></div>;
}

export default App;
This should log an object on the console of your React App webpage (http://localhost:3000). The object would look something like this:
{
  token: 'eyJhbGciOiJIUzI1NiIsInR5cCI6IkpXVCIsImN0eSI6InR3aWxpby1mcGE7dj0xIn0.eyJqdGkiOiJTSzQ5MDY4NTBlZTJjYjliODhhZjI4Mjg5YmRiNGIwNzlkLTE2MzEyMTU5NDIiLCJncmFudHMiOnsiaWRlbnRpdHkiOiJhbmFueWEiLCJ2aWRlbyI6eyJyb29tIjoicm9vbS0xIn19LCJpYXQiOjE2MzEyMTU5NDIsImV4cCI6MTYzMTIxOTU0MiwiaXNzIjoiU0s0OTA2ODUwZWUyY2I5Yjg4YWYyODI4OWJkYjRiMDc5ZCIsInN1YiI6IkFDZmE0ZmFkMjM2ZmU3ZDQ4MzMzYWVkY2M4YzU2ODM0MmUifQ.YRZBmmSChJArR4PzW0A0W68DMKzJ_tC6EK4aWK17NRc';
}
And we're done! We know that the server works as expected and the client can request Access Tokens from the server by simply making GET requests.
Conclusion
In this tutorial we completed the following tasks:
- Set up the client-side React Application
- Get Twilio API Credentials
- Set up an Express server
- Generate Access Tokens on the server using the Twilio Helper Library
- Send the generated Access Token to the client by handling
GETrequests - Test the working of the server API by making a
GETrequest from the client to the server
You can check out the source code of the tutorial here.
In the next part of this tutorial series I will be covering the client-side interface to set up video calling on the React App. Stay tuned!